Monday, December 30, 2013

What it was and what it will be...

I can't believe it's that time of the year again! Last January I wrote here about my thoughts, predictions and hopes for the health food trends of 2013. I was just re-reading,  and I must admit, I was pretty much on the money...Here are my reflections of the past year and what I think is coming ahead:

1. If the theory of Evolution is right, the newer generations will not grow teeth. We're not chewing any more!!! Between the Vitamixes and all the other power blenders of the world, the smoothie and juice joints and services, the ubiquitous frozen yogurt places,* the fancy nut and seed butters, and all those squeezable pureed foods that started for babies and now make products for every age, we can seriously let go of our pearly whites. Why don't we want to chew any more? Is this the New Fast Food? What do you think?

Displaying photo.JPG  
*According to my observation-based pseudo scientific research, there are now more froyo stores in Manhattan than nail salons, and that's a pretty shocking stat!!!

2. Sorry, but not only gluten is out, but grains (and sugar...duhhhh) in general are being blamed for causing a lot of disease. In his best selling book Grain Brain: The Surprising Truth about Wheat, Carbs, and Sugar--Your Brain's Silent Killers, neurologist David Perlmutter, MD holds grains responsible for a lot of our current scariest diseases such as dementia, ADHD, anxiety, chronic headaches, depression, etc. Just add this to the highly popular Primal/Paleo diet and digestive SCD and GAPS protocols, and the picture isn't looking that bright for whole grains.This means good news for nuts and seeds used ground as flour substitutes, and I foresee an abuse on those too until they are blamed for something else. I'm not ready to bid farewell completely to my whole grains yet, but if I owned Kellogg's stock, I would sell (although I should keep at food/nutrition advice and avoid financial ones that I don't really understand).
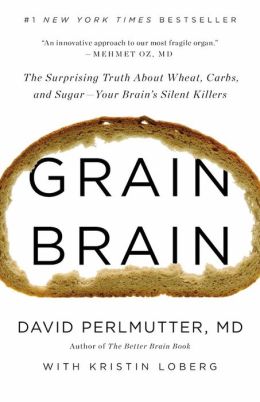
Grain Brain: The Surprising Truth about Wheat, Carbs, and Sugar—Your Brain's Silent Killers


3. The "it" cuisines are from the South. All the way down to the Andes and the Amazon (the region, not the estore, although I'm sure that's where you can purchase the majority of the ingredients). Peru is the place to go and to purchase from. It started with quinoa, but it hasn't stopped there. Inca superfoods like maca, lucuma and camu-camu and the sweetener yacon are going to keep making their way into our hearts (via smoothies), and I'm betting on kaniwa to become the newest it grain (which is actually a seed). I just hope we get to do it through fair trading and the locals getting something worth in exchange, as we've already taken all their quinoa...According to Vogue, "the latest detox vacations are taking place not only off the beaten track but well above it," with high altitude treks on the Inca Trail. The other place whose ingredients we'll keep getting to know is Brazil. This huge country (which is actually hosting back to back the World Cup and the Olympics, so we'll be learning a lot about it via the media) has unbelievable produce, many with incredible nutritional value that has only been started to get promoted in these latitudes. We already know about acai, but I believe produce with rhythmic names like umbu (high in disease preventing polyphenols), pitanga (with suggested anticancer and anti inflammatory properties), caju and many others, will eventually make it into the American market, labeled as superfoods. Award winning chef, Alex Atala recently published D.O.M.: Rediscovering Brazilian Ingredients, a beautiful coffee table book with foods you didn't even know existed. It's a wonderful eye candy (I wouldn't even dream attempting any of the recipes) and introduction into the exotic foods of Brazil.  
Image from D.O.M.: Rediscovering Brazilian Ingredients (caju)


4. The "it" sweetener is now yacon syrup, which is extracted from the yacon tuber from...Where else? Peru. I had been wanting to write about it for many months, but Dr. Oz had it on his show before I got to do my post, and by highlighting some weight-loss properties from the sweetener, the already hard-to-find syrup, completely vanished from the shelves and the web (unless you're willing to pay like $40.00 plus shipping for a minuscule amount). Yacon is low glycemic, tastes like a cross between molasses and maple syrup, has 50% less calories than sugar, and it's highly concentrated in inulin--a type of fiber that breaks down into fructooligosaccharides (FOS), which are prebiotics (feed the good gut bacteria). Yacon contains potassium, calcium, phosphorous, iron and some amino acids. Just a warning (if you are ever able to get a hold of it): that same wonderful inulin, is also present in Jerusalem artichokes (which I love), and if you've ever had those, you might have realized that they can make you really gassy. So no yacon syrup before a business meeting or a first date! 
 

5. Cultured foods--My most fave topic, so I'll try to keep it short. For a longer spiel, read here. Although there's much more research to be done ahead, keeping out gut microorganisms happy and abundant is essential for good health, not only digestive, but general health, from brain to skin. Small pickling shops have been popping up everywhere in Manhattan, and that is a fabulous trend. When purchasing sauerkraut, kimchi, kvass, or any other pickled vegetables, look for unpasteurized ones that have no vinegar (both kill those bacteria that we need to eat/drink) and no preservatives nor other artificial additives. Dairy kefir and water kefir have been increasing in the market as well, which is excellent news (especially for my son, whose main source of food is kefir). However, my strongest bet goes to COYO. What? You might ask...It stands for coconut yogurt. Made by pureeing (again, the trend I listed under 1.) the meat and water of fresh coconuts and then culturing the blend with yogurt or kefir cultures (microorganisms), slightly sweetened and some times even flavored, I expect to start seeing it EVERYWHERE within the next year. 
Young Coconut Yogurt
Recipe and image from: http://www.rawfoodrecipes.com/recipes/young-coconut-yogurt.html


6. Despite Mayor Bloomberg's efforts to forbid the sale of gigantically-huge-humongous sweetened drinks--that are undeniably bad for anyone--the industry seems to be getting it its way. But not without a fight. I applaud The New York City Health Department's TV and subways placard ad campaign against soda, sports drinks, teas and energy drinks.It's just so easy to inadvertently gulp down huge amounts of sugar without even noticing. I'm glad they are trying to educate people about it! 
http://www.crainsnewyork.com/apps/pbcsi.dll/storyimage/CN/20100802/FREE/100809973/AR/0/soda-ad.jpg?q=100

7. BPA-free canning. Eden organic has been doing it for a while with their beans, but other food companies such as Crown Prince Natural (canned wild fish) and Farmer's Market (vegetable purees) are joining in lining their cans BPA-free. What is BPA? Short for bisphenol A is an industrial chemical used to make certain plastics and resins since the 1960s. BPA is found in polycarbonate plastic containers (often used for storing food and beverages) and epoxy resins are used to coat the inside of metal products, such as food cans, bottle tops and water supply lines.Research has shown that BPA can seep into food or beverages. Exposure to BPA is a concern due to possible health effects on the brain, behavior and prostate gland of fetuses, infants and children and fertility issues in adults.Therefore, it's a good thing that if you consume canned products and/or use plastic containers, that you purchase the ones labled BPA-free.


8. It's been a juicy year for celebrity chef scandals. I guess it all comes with the territory, however, I do  hope Nigella Lawson goes to rehab, puts her personal and professional lives back together and keeps showing up on TV and writing wonderful cookbooks that turn recipes into experiences I want to go through. I can't help it, ever since How To Be A Domestic Goddess many years ago, I've been a big fan. 

9. "Healthy Eating" is IN and vegetables are cool. The once-blah-now-superhip Bon Appetit magazine has done a great job promoting them. 
food lovers cleanse main
Photo by Carin Olsson for Bon Appetit


10. Here, here and here are some lists of the best cookbooks of 2013. However, the ones I personally used the most are:
-Gwyneth's It's All Good
-Kim Kushner's The Modern Menu
-Yotam Ottolenghi and Sami Tamimi's Ottolenghi: The Cookbook (although this book was a re-launch not really a 2013 release) 
- Estee Kafra's Cooking Inspired


NUT/SEED MYLK 

 I keep getting requests on how to make nut and seed mylks such as almond, hemp, cashew, etc. You can basically turn any seed or nut, even coconut (either dry or fresh young)--although not chia seed-- into "mylk" by pureeing it with water, and passing the mixture through a sieve. You can flavor it with spices and sweeten it (I like making mine with dates). By making your own mylk, you avoid any harmful additives such as carrageenan, and others that are common in most milk alternatives. There are endless possibilities, my favorite proportions are:

Ingredients
2 cups organic raw nuts (almonds, cashews, walnuts, Brazil, macadamia, hazelnuts, unsweetened shredded coconut, etc) or seeds (pumpkin, hemp, sunflower seeds, sesame, etc)
4 cups water (plus more for soaking the nuts and rehydrating dates)
10 pitted dates (or raw honey, yacon or pure maple syrup or coconut nectar)
1 vanilla bean (or 2 teaspoons pure vanilla extract, but I recommend the bean)
1/8 teaspoon sea salt

Optional: mesquite flour, ground cinnamon, cardamom, allspice, ground ginger

Method
  • Place the nuts/seeds in a container and cover them with fresh water by 2 inches. Cover and refrigerate overnight. If using cashews, soak between 2 and 4 hours. In a separate container, soak dates in water overnight.
  • Drain nuts and dates and rinse them in fresh water. 
  • Place nuts, dates and 4 cups fresh water in a blender and blend until smooth. Time will depends on your blender.
  • Split the vanilla bean lengthwise and scrape the seeds with the back of a knife into the nut/seed-water mixture. Add salt and spices, if using, and blend again.
  • Set a large bowl with a fine mesh strainer/sieve on top* and pour the blended liquid into the strainer, pressing with the back of a spoon to extract more liquid. 
                              
*If you want a completely smooth mylk, line the strainer with cheese cloth.


  • Voila! Refrigerate and enjoy!

Tuesday, December 10, 2013

Sea Veggies:

You have to live under a rock not to notice the invasion of sea vegetable snacks of the past couple of years. They come nicely packaged, and moms allover are thrilled to feed them to their children en lieu of potato chips and other crunchy, uber-processed snacks. 


I will first disclose that I've never purchased any, as none of the brands are kosher certified --the only explanation I found for the need of certification in sea vegetables, is that some times, the seaweed sheets can have tiny parts of sea horses pressed into them--but I'm sure a kosher manufacturer is looking into it in China as I write. However, I do feed seaweed snacks to my kids. I just make them myself at home, and I'm happy to keep preparing them, as I know exactly what goes into the treat (and they only take minutes).

Let's first talk a bit about seaweed, algae or sea vegetables. The foremost thing to keep in mind is that you should buy them in organic form--or at least know their place of origin--as you've probably heard  how polluted with heavy metals our oceans are, and that's exactly where sea vegetables grow. Organic certification ensures that the sea vegetable is either "farmed" in a closely-monitored, contained water environment; or that it's harvested in the wild, but in a region where the water is better protected against pollutants. 

Now...why on Earth would you want to eat algae? 

Well, they have the richest concentration of minerals of anything that's edible, as they absorb all the ones present in the ocean. They also have a great variety of phytochemicals, and a special kind--called fucoidans--that's unique to them and has anti-inflammatory, anti-viral, and cardiovascular benefits; they also contain other unique types of antioxidants. They are an excellent source of iodine (therefore they are good for our thyroid) and vitamin K. They are a good source of some B vitamins, magnesium, iron, calcium, vitamin C (which is a perfect pairing with its iron content for digestibility) and E. 
Some seaweeds are also very rich in Omega 3 fatty acids (that's where fish get them from!). Sea vegetables also contain vanadium, which may play an important role in blood glucose regulation. Sea vegetables also have cholesterol-lowering effects, and this may play a role in decreasing the risk for some estrogen-related cancers (such as breast cancer). Besides thyroid benefits, it's been suggested that sea vegetables are good for our immune system, and our adrenal glands.
Some sources indicate that sea vegetables help our bodies detoxify from heavy metals, environmental pollutants and carcinogenic substances (although more research is needed in this area).

Culinary speaking, sea vegetables are a typical ingredient in Asian cuisines, especially Japanese. However, they've been consumed by most societies in coastal areas, from New Zealand, to South America, to Ireland. They have a rich umami flavor, which can make them a great ally in the kitchen to add some "deliciousness" to dishes, and which may explain why we love sea weed chips, sushi and miso soup so much!
Seaweed is classified into categories by color, and that's how we get brown, red or green algae.

The following are my favorite (and easier to find at health food stores and online, with kosher certification) kinds of sea vegetables:


Nori: this is the one in sushi. It's sold as squares (although it doesn't grow like that. It's a mixture of red seaweeds that are pressed together and dried). You can find it toasted (dark green) or untoasted (almost black), and you'd need to toast it before using it: 6 to 7 minutes in a 350 F preheated oven does the trick. You can use it to wrap virtually any food. The untoasted one is the right one for making chips, and you will season the nori before toasting it. 

- Kombu: A brown algae that's great for making soup. It imparts its umami flavor and releases many minerals into the stock. Throw a piece of dried kombu into the pot when cooking beans or chickpeas or other hard-to-digest vegetables, as kombu makes them more digestable. You can remove it after 20 minutes and the food will be infused with flavor, minerals and its nutrients will be more available to you body. 

-Wakame:  It looks a bit similar to kombu, and it's one of the highest sources of vegetarian omega-3s.If you've ever had miso soup, the green leaves floating in it along with the tofu are wakame. To prepare it, soak it in cold water for 5 minutes. Remove, slice (removing tough stems, if any) and add it into soups, stews, or grains. It goes really well with citrus and acid, in general. Wakame can be roasted until brown and crispy and can be used crumbled as a seasoning, the way you'd use salt.

-Arame: Also a brown algae. It has a mild flavor (therefore a great one to start if you've never had seaweed) and is usually sold as strands. You can just soak it in cold water for 5 minutes, drain and throw it into salads, saute with vegetables or cook it along in soups after soaking. Boil it for 10 minutes and add it to marinated dishes.

SEA WEED SNAX

Ingredients

-Nori sheets (as many as you need), not toasted

-Expeller pressed olive, coconut or grape seed oil spray (or oil and a pastry brush) OR
honey, coconut nectar or maple syrup dissolved in water, so they are not as sticky

Toppings: fine sea salt, spices, nutritional yeast, dry herbs, unsweeted coconut shreds, sesame, chia, hemp, poppy seeds, citrus zest, honey, coconut nectar or maple syrup (dissolved in water)

Method
1. Preheat oven to 350 F. Line a (or 2) rimmed baking sheet with parchment paper. 

2. Place as many nori sheets as you can fit in one layer on the baking sheet(s). Lightly* spray (or brush) nori on one side with oil or dissolved liquid sweetener.

3. Sprinkle with topping and bake for 6 to 7 minutes, until nori changes from black to dark green. Cool and enjoy.

*Lightly is the key word. You don't want it soggy.


Some suggested combinations:
-Olive oil + nutritional yeast + chipotle powder or smoked paprika
-Coconut nectar + coconut shreds+ sea salt + hemp seeds
-Olive oil + sumac + garlic powder + lemon zest


Thursday, November 14, 2013

Lime-Avocado Mousse with Bee Pollen Sprinkles

I really shouldn't be doing this right now. I need to work on a project with a very tight deadline. However, this was very delicious and wanted to document and share it.

I been making this mousse as a cupcake topping for a client who follows the SCD protocol. It's also Paleo and GAPS friendly. It's dairy, egg and gluten free, but not considered vegan because it contains honey and bee pollen.
I get both, my raw honey and my bee pollen from Andrew, the bee keeper with a stand in the Union Square Farmer's Market. This way I can make sure they are local and carefully produced.
Please note that if you suffer from pollen or bee allergies, you should leave out the bee pollen in the recipe. But if you are in the clear, bee pollen is an incredible superfood. It's rich in zinc, which is an essential mineral for our immune system. It also contains calcium, iron and potassium and all B vitamins (with the sole exception of B12), it has enzymes, increases stamina, and....Guess what? It's one of the richest sources of complete protein (contains all essential amino acids) on the planet and it's in a highly digestible form. For a bit more on pollen go here.

Now to recipe, and back to work...

LIME-AVOCADO MOUSSE WITH BEE POLLEN SPRINKLES 


Ingredients

1/3 cup raw cashew nuts, soaked overnight, rinsed and drained
2 small avocados, flesh only
1/4 cup raw honey
3 lime, juices and zest of 1 lime
1/4 teaspoon sea salt
2 tablespoons bee pollen 

Method
Grind the cashews in a power blender (I use a Ninja 100Wts). Add the avocados and blend again until light and creamy. Add honey, lime juice and zest and salt. Blend again and season to taste. You might need more salt, or honey, depending on your preferences.

Divide the mousse among 5 serving bowls, jars or glasses. Sprinkle tops with pollen right before serving. 

Mousse keeps well (and still green) for up to 2 days, covered airtight and refrigerated. It even freezes well (without the pollen)

Tuesday, November 12, 2013

From kitchen counter to face: an all-natural moisturizer

I come from a family of women whose faces don't wrinkle. No lasers, knives, needles, lotions, potions, peels. None. Maybe just a facial scrub with Scotch-BriteTM before bed when they remembered. That would be it.
"Lucky me," you may say. Well...not really. I broke the genetic progression of naturally smooth faces in the family. I'm definitely grateful for having skin, I truly am. However, mine has required a lot of attention and care since early childhood due to hypersensitivity to sunlight (transparent-pale skin), acne, large pores, some scares with skin cancer, spots of every color and size that could be a board exam for a dermatology fellow, and yes, premature (I say it's premature, because I'm still 20 years old in my mind, and age is a mental state, right?) signs of aging. All this to say, that ever since I can remember, I've been in the quest for the perfect skin care product (which includes watching Cindy Crawford's infomercial at 2:00 AM, and even worse...ordering it), hoping that I'd find the magical answer. I've amassed a great deal of products, information, opinions and hopes. And for the last year, I've been concocting my own, tweaking a bit at each batch with the hope of avoiding extra toxins and compounds that may keep me wrinkless now and make me sick (or bankrupt) tomorrow.
I mentioned my homemade moisturizer recipe at a lunch, and a friend told me that's something she wanted to read about in my blog! Time has flown since then, and I've been busy writing an instructional baking book for beginner bakers (more on that later....), freelancing and preparing for some exciting events that I will be announcing soon. So, Megan, finally, it's here, and right on time, as the heaters are now on in everyone's households, the fall winds are blowing and the season is becoming more dehydrating and harsh on our skins.

Alexandra's Moisturizer


INGREDIENTS
30 g (2 tablespoons) raw red palm oil
30 g (2 tablespoons) virgin (or extra virgin) coconut oil
30 g (2 tablespoons) castor oil *
20 drops tea tree essential oil
20 drops neem essential oil
A few drops oil of oregano (see indication in bottle for oral consumption and add that, as concentration varies depending on brand)
10 drops lavender essential oil, optional


*may be substituted for raw almond or extra virgin olive oil

METHOD

In a clean glass jar, combine all the ingredients. Cover and shake to mix. 

If coconut and/or red palm oil are solidified, place them first in the jar. Melt them by placing the jar in a small saucepan with simmering water. Remove immediately and add the castor and essential oils (don't heat essential oils or they may loose some of their strength).

 photo.JPG

Close jar and store away from light in a cool, dry spot. Use as needed (I use it twice a day: in the morning and before going to bed).

Makes about 1/3 cup of skin moisturizing oil.

Rational behind the concoction:
 Red Palm Oil: If you don't have some in your kitchen, I do recommend you get some, to make the moisturizer and to add to your meals (it has a slight peppery taste that is easily complemented with other flavors). I first tried this oil about 15 years ago when I went to Brazil for the first time. It's a traditional cooking oil in the North Eastern state of Bahia. The African slaves brought with them their beloved red palms into the New World, and the oil is still an essential ingredient in the most traditional dishes of the Northeast of Brazil. I was ecstatic when I found it at Whole Foods, and you will soon see it everywhere else! Its deep orange color is due to its super high concentration of carotenes (beta-carotene and lycopene), which are powerful antioxidants. Our bodies transform carotenes into vitamin A, which is an essential nutrient for healthy skin (it prevents wrinkles, acne, helps rebuild tissue, helps healing scrapes and wounds and regulates cell growth). If that weren't all enough, red palm fruit oil is also densely packed with tocotrienols, a form of vitamin E, another essential nutrient for healthy skin (an effective antioxidant that helps fight free radicals, which are one of the major causes of premature skin aging).  

Virgin coconut oil: this tropical fruit oil has regained popularity in the last couple of years. Its long term effects in modern cooking have not been shown yet, as it's more like a wait-and-see thing (I do use it often in my cooking and baking, but it's NOT the only oil I use). However, it's definitely a great moisturizer used for thousands of years. See here for more information. 

Castor oil (which you shouldn't keep in your kitchen, but in the medicine counter, as it's a strong laxative, can help induce labor and start the flow of breast milk, but you don't want to ingest it in your salad!). It's traditionally used in India as skin care and has anti inflammatory and antimicrobial properties.   

Neem is a tree that originated in India. Its bark, leaves, fruit, seeds and oils all contain medicinal qualities. Neem is antiviral, antifungal, antibacterial, antiinflammatory and helps to relief pain. It's very high in antioxidants that protect skin from environmental damage. Contains carotenes and vitamin E as well. FYI: It doesn't have a pleasant smell!

Tea Tree oil is distilled from the leaves of the Australian melaleuca tree. It also possesses antimicrobial and anti-inflammatory properties. It has been proven effective in treating acne, warts, cold sores and that's why you can find it pretty much in every single beauty product available. 

Oil of Oregano is a very potent antibiotic, anti-inflammatory, anti-bacterial, anti-fungal, antioxidant, anti-parasitic, antiseptic, anti-viral, and disinfectant. Just what the face needs!

Lavender- I started adding it to counteract the bad smell of the neem oil, and it was a great addition, as lavender is also a potent natural antibiotic, antiseptic, detoxifier and it stimulates the immune system and tissue repair. And...in case the moisturizer doesn't help with the wrinkles, lavender is also a natural antidepressant!

NOTES: Keep castor oil and essential oils away from the reach of children and in clearly labeled containers. Don't use them before asking your doctor if you are pregnant, as essential oils are very concentrated. Also, discontinue using moisturizer in case your skin reacts adversely to it. My skin has been very happy, and I hope yours becomes happy too, but we're all different...
  For some tips on healthy looking skin, go to:
http://www.mindbodygreen.com/0-1302/7-Ayurvedic-Skin-Care-Tips-for-Healthy-Glowing-Skin.html

Monday, October 21, 2013

Challah: Nourishing our bodies and our spirits

I recently finished reading The Slow Down Diet by Marc David and loved it so much that I want to start it over again. So much to think about how we feed ourselves and what eating healthy really means... David argues that besides the commonly recognized nutrients, in order for us to function optimally, we should accompany our meals with relaxation, quality, awareness, rhythm, pleasure, thought, story and the Sacred.
In Judaism, nothing encompasses all those better than challah. We now think of challah as a delicious, rich braided bread, but the term challah refers specifically to a portion taken from the prepared dough.
I personally love kneading the ingredients by hand. I find doing so extremely meditative, relaxing and it feels so good! I get to breathe, think, and hope. I know it can become a difficult task to knead 5 pounds of flour (the minimum amount required to make a blessing during the separation of the dough) into dough, so if you own a bread-maker or a standing mixer with a dough hook and would like to use them, by all means, whatever makes you happier is best! Just note, that you can mix the ingredients in separate batches, but once mixed, you should put all the batches together into one mass to be able to separate the dough to make "challah."
Once the ingredients are mixed together, a pliable dough forms after kneading (due to the development of gluten, a now dissed protein, but the one and only capable of giving bread dough elasticity). Then, the challah is left to rise until it doubles its volume (time varies among recipes, but it could be about 1 to 2 hours), a blessing is recited (if 5 or more lbs of flour were used) and a piece (actual size varies according to authorities from the size of an olive to the size of an egg) from the whole dough is taken. That piece is The Challah. The required pause is a time that connects our human effort with G-d and His miracles, His gifts to us and His limitless powers. The moment of the separation distinguishes our humanity from His holiness, but also becomes a bridge that connects them both. Here's a great opportunity to access G-d, ask for a spouse, healthy children, good livelihood and/or good health. It's a moment that makes us aware of what we are doing, it makes us think about our lives and it's a time that can bring us together as a community. The power of the challah grows exponentially when separated by many people for a common cause. Please join me to make challah this week and include my friend's mother's name Diana bat Sophie in your prayer for a complete recovery.
The separated portion should be burnt (as a symbol of the challah that was given to the Priests in the times of the Temple). 
Once the piece of dough has been taken, you can go ahead and focus on the esthetics of the loaves. A shiny golden challah is the perfect decoration for a beautiful Sabbath table, and can inspire everyone sitting around it. 
Once shaped, you can wrap loaves up in plastic and freeze them. The freezer stops the rising process, but doesn't kill the yeast, so once the dough thaws, the rising continues. If you prefer, you can let the loaves rise a second time (about 45 min) and bake them in a 350 F oven. If it's late at night once you're done with shaping, no need to stay up waiting, just place shaped loaves in the refrigerator and let them rise overnight. The fridge slows down the rising but doesn't stop it completely.
Before baking, make sure your oven is preheated, brush challah with egg wash (if you want to), sprinkle it with toppings (again, up to you) and bake it. Here's comes the pleasure Marc David recommends: the smell wafting through your kitchen, a loaf that looks like a palpable miracle, tastes like glory and marks the rhythm of the weekly cycle. The fresh challah also carries along a story: your story, your hands, your creativity, your life, your thoughts and your prayers.
As for quality, making your own bread ensures you use no horrible artificial ingredients. You make something amazing out of very simple components, and that's why all the ingredients should be carefully chosen.
Then, the challah loaf is blessed, the bread is broken with friends and family, and who doesn't get excited by the first bite? Suddenly, everything seems happier, tastier, better. And then, at the end of the meal hailed by the challah bread, another blessing, this time, a special song of gratitude. 
In a nutshell: challah is, an opportunity to feed our spirit, our bodies, most of our needs and connect with G-d through a tasty loaf of relaxation, quality, awareness, rhythm, pleasure, thought, story and the Sacred. 

Here's a challah recipe I like, but feel free to use your favorite one. The internet and many cookbooks have tons of them. Your choice.
And please, please comment, ask or add on to this post in The Irony of Baking's FB page at: https://www.facebook.com/eatyourcakeandeathealthytoo

CHALLAH 
4 cups (960 ml) lukewarm water
8 teaspoons dry yeast (3 1/2 packets)
1 tablespoon honey
5lbs bread flour (all-purpose flour or white whole wheat flour can be used instead, try using organic)
1 1/2 tablespoons fine sea salt
1 1/2 cups honey (I like using local honey from the farmer's market)
5 large cage-free eggs (2 of them separated and egg whites reserved)
1 1/2 cups plus 2 tablespoons expeller pressed safflower oil (evoo, sunflower seed, rice bran, avocado or melted organic coconut oil can be substituted)

Additions: 
-1 tablespoon culinary grade lavender, crushed 
-Sesame, poppy, flax or chia seeds for topping
-1/2 cup raisins and/or dried cranberries, cacao nibs or chocolate chips

 BEFORE YOU GET STARTED, MAKE SURE YOU KNOW THIS ABOUT WORKING WITH YEAST:
  • check expiration date on yeast
  • treat yeast like a baby: test the water temperature for activating the yeast with the inside of your wrist, and if you'd bathe a baby in it, then it will work for the yeast. If in doubt, err on the colder side, as it would slow down the process, but water that's too hot would kill it
  • yeast loves sweetness, so add 1 tablespoon of honey (or sugar) into the water for activating
  • use a glass, ceramic or plastic bowl or cup to activate yeast. Metal may inhibit the process (trust me, it's happened to me)
  • if the sweetened warm water and the yeast don't start bubbling after 5 minutes, toss the yeast and run to your nearest Food Emporium to get a new package
 METHOD
1. Dissolve yeast in the lukewarm water with 1 tablespoon honey. Set aside.
2. In a huge bowl (or 2 large ones), mix flour and salt with a spatula or wooden spoon. Make a well in the center.
3. Pour into the well the remaining honey, the 3 eggs and two yolks,  1 1/2 cups oil and the activated yeast mixture (that should be bubbly and dense). Mix with a spatula and then knead, preferably with your hands, until the dough is elastic, and if you press it with a finger, the indentation disappears soon after it's made (it should bounce back). If using any additional ingredients like lavender or raisins, add at this point.
4. Combine all the dough if it was mixed in separate batches.
5. Cover dough with remaining oil all around, including the bottom and place back in its bowl. Cover bowl with plastic wrap or a moist kitchen towel and let to rise in a warm place until it doubles its volume (about 1:45 hour to 2 hours). Go to your spinning class, catch up on your email or make dinner, but make sure you set a timer (I usually ask Siri to tell me when the time has passed).
6. Now the most important part: separate the challah with a blessing, and be really aware of what you are doing to make the best of this special moment. Remember to add Diana bat Sophie into them!
7. Shape the challah (see tips below). Cover loaves loosely with plastic and let them rise again for about half hour.
8. Preheat oven to 350 F.
9. Brush loaves with the reserved egg whites, and sprinkle with seeds, if using
10. Bake until golden brown and when bottoms of challahs sound hallow when tapped. Time will depend on the size of the loaves made.

Enjoy your hard work, your connection with G-d, the good fortune of your prayers and the most special of foods...
 
 VARIATIONS:
*GLUTEN FREE CHALLAH:
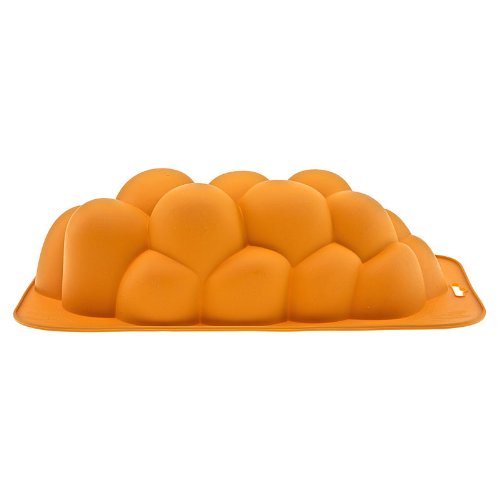
Substitute flour with 5 lbs of GLUTEN FREE OAT FLOUR mixed with 3 TABLESPOONS xanthan gum. Note that without gluten, dough will be hard to shape into braids. I have one of these challah molds to do the trick!

*EGG FREE CHALLAH:
Omit eggs OR add instead 3 TABLESPOONS flax meal mixed with 9 tablespoons water

  
BLESSING FOR THE SEPARATION OF THE CHALLAH (you can say it in Hebrew, English or whatever language you want) From Chabad.org

Hebrew:
Transliteration:
BA-RUCH A-TAH A-DO-NOI ELO-HAI-NU ME-LECH HA-O-LAM A-SHER KID-SHA-NU B'MITZ-VO-TAV V'TZI-VA-NU L'HAF-RISH CHAL-LAH
Translation:
Blessed are You, L-rd our G-d, King of the Universe, who has sanctified us with His commandments and commanded us to separate challah.

Separate a small piece of dough, approximately one ounce, and say: "This is challah."
Burn the challah by wrapping it in a piece of silver foil ands placing it in the broiler, or by any other method. (If burning it inside the oven, there should be no other food baking in the oven at the same time.)

SHAPING CHALLAH: 
Here are some suggestions, but visit The Challah Blog if you want more specifics:

http://www.thechallahblog.com/p/shapes-at-glance.html


-You can make traditional 3-stranded braids, or could make each loaf by making a large braid and placing a smaller one on top lengthwise.
http://culinarykosher.com/cooking-videos/wp-content/uploads/2012/10/Simcha-Challah.jpg
From   http://culinarykosher.com/cooking-videos/wp-content/uploads/2012/10/Simcha-Challah.jpg


 -No time or patience? you can make an impressive challah by shaping portions of dough (whatever size you want) into balls and throwing a bunch of them in a cake or loaf pan. There you have pull-apart challah.
From http://chickinthekitchen.com/2012/02/13/pullapart-challah-rolls/

-I like making 4-stranded challahs, you just remember to go: "over, under, over" from right to left, and then starting over with the strand to the left.

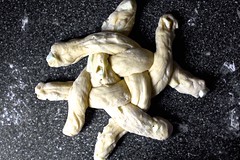
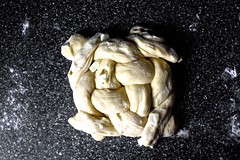
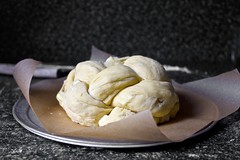
-My favorite these days is Smitten Kitchen's round challah method that looks gorgeous and is so easy. 
small center weave weave to the right!
weave to the left! tuck corners under and behold awesomeness
 From: http://smittenkitchen.com/blog/2011/09/apple-and-honey-challah/


Thursday, October 3, 2013

The Food Pharmacy

This past week, two people dear to my heart suffered from bad burns in their arms while in their kitchens. One of them rubbed butter on the wound right after the burn, which was a TERRIBLE mistake, as fat retains heat and that's exactly the opposite you need when the skin needs to cool down. 

Due to those two burns and in preparation to the imminent arrival of the flu (and regular cold) season with all its greatness, I decided to use this post to write about the most potent food-derived remedies I know of and that I have successfully used with my family.

Of course, as much as I love telling people what to do, this is no substitution for medical advice!

Now, let's get back to the burns. As many of us know, instead of oil, something cooling like ice or cold water is the way to go. My grandmother used to rub egg whites on burnt skin, and I remember it healing quite well, however, some doctors do not recommend that, as there's a concern for infection.

A great (in my opinion, the best) option is to always keep available a jar of good raw honey.  I wrote about it extensively here. But I'll recap. To a certain degree, all raw good quality honey has antibacterial, antiviral, anti-fungal and anti-inflammatory, properties and compounds that help reduce pain and stimulate tissue repair. However, the strength of all those compounds vary from honey to honey depending on how it was produced, its place of origin, and the kind (s) flowers it derived from. Darker colored honeys tend to have stronger medicinal properties, but it's not a rule. 

Manuka honey has been widely studied and has shown amazing results for healing skin wounds and burns.  Manuka is a specific kind of honey derived from the pollen of the Manuka bush flowers that are native to New Zealand. This particular honey contains a strong antibacterial compound (MG), and honey producers in that country developed a scale to rate the potency of each specific batch of manuka honey depending on its concentration of MG. That rating system is called UMF, and in order to be considered of therapeutic level, the manuka honey should have a minimum of 10 UMF (and that's marketed as Active Manuka Honey). That's why if you decide to invest (yes, for all the reasons stated above, producing, transporting, distributing and buying manuka isn't cheap) in a container of manuka, make sure you purchase one that is above 10.

With all this said, a local raw honey might (or might not) be as effective and full of amazing compounds as a jar of manuka, but there aren't any rating systems established in the U.S. A farmer's market is a great place to buy local honey, and the person selling it might know about the composition of his/her honey, and to some extent, all honeys contain beneficial compounds. Avoid giving honey to children under 1 year of age and don't go for the $2.00 squeeze bear of processed (pasteurized) honey. That's been depleted from all the goodness.
Since honey never spoils, it's a no-brainer to always keep a jar in the cupboard (or in the medicine cabinet).

I did criticize above the old belief that butter heals burns as a false remedy passed by our mothers or grandmothers. But credit is due to our mothers, grandmothers, and great, great, great, great....great grandmothers and their herbal, food, home and folk remedies. Many of them are now being backed by science as the best ways to make us feel better and help us recover without scary side effects.

Chicken soup, chamomile tea, brewer's yeast, rice and carrots, burnt orange juice...Which ones did you grow up with? I'd LOVE to hear from your personal home remedies, please share in The Irony of Baking's FB page here.

In my family, freshly squeezed lime juice with honey were essential when we had a cold, and I keep giving that to my children. The vitamin C from the citrus and the properties of the honey are proven to help the healing process. Remember to use RAW honey!  
At my friend Karla's home, they took it to the next level: the concoction also had fresh minced garlic, which although didn't make it quite as palatable, the allicin and other active compounds in garlic contributed even further with their strong anti-viral, anti-bacterial and anti-fungal properties (plus garlic also helps prevent cancer, heart disease and inflammation).

I grew up in a household were home remedies, homeopathy, shamanism (although this one freaked me out), acupuncture (I never forgave my mom for that one!), herbology and traditional medicine were all welcome, and I'm thankful for that (with some exceptions). When we had bad coughs, while in bed ready to sleep, an adult would iron a couple of sheets of newspaper a la Downton Abbey, and still warm (but not burning), would put them directly on our chests and backs, then PJ's on top, blankets and we were supposed to sleep. That's where the problem was: the smell of warm newspaper made me gag and the stiff pulp pajama that creaked as I tried to move left me sleepless. How was I supposed to get better? That's why I don't iron my children when I put them to bed (nor subscribe to the NYT), and why when my grandmother called me to praise the wonders of Oil of Oregano to heal/prevent coughs and colds, I was a bit skeptic. 

But then, Gwyneth, my idol, also raved about the pizza joint-smelling extract; and I was all in (pathetic...I know, but when Gwyneth says jump, I jump!). Oil of oregano (make sure it's good quality) is a very potent antibiotic, anti-inflammatory, anti-bacterial, anti-fungal, antioxidant, anti-parasitic, antiseptic, anti-viral, and disinfectant. It's quite strong, so it must be diluted before consuming it or using it topically, and the dilution depends on the concentration of the specific one you find. Make sure to read the directions on each specific bottle, as the recommendations may range between 4 and 40 drops! For adults, I use the recommended dosage and I mix it with honey or in a smoothie, the minute we start feeling sick, and for children, I add half of the recommended amount to their honey and lime mixture. It's remarkably effective. 

Another successful tip from my grandmother's repertoire is Celery Tea. It works like magic for menstrual cramps. I tried to find something about it online, and although I found recommendations for celery seed tea, grandma taught me that if you steep a couple of celery ribs (and leaves) in hot water for about 10 minutes, and sip it (you could add honey) you can be ready to roll out of bed and go about your day as if no monthly visits had tortured you before the tea. I couln't find much science to back it up, but all my friends from high school adopted the remedy due to its success. It does work!

For stomach ache, I grew up with the typical (and very effective due to its calming and anti-inflammatory compounds) chamomile tea. When I got pregnant for the first time and suffered from morning sickness all day long, I learned about the effectiveness of ginger for nausea and indigestion. But that's not all about ginger. Read this and you'll always keep some of this fresh root handy.

And I couldn't go on without mentioning turmeric, which is an incredible anti-inflammatory and antioxidant rhizome. You can easily purchase it in dry (or fresh) form and add it to dishes, smoothies or tea when you suffer from any sort of inflammation to accelerate the healing process. The turmeric compounds (AKA curcuminoids) are absorbed by our bodies much better, when consumed combined with black pepper and/or with fat. Some good ideas are curry dishes (with coconut milk, coconut oil) or olive oil, nut butters, avocados, or even with chocolate!

Now...don't even get me started on fermented foods, especially right after a round of antibiotics. The more kinds of cultured foods, the better your flora will get restored. My mom Z"L used to give us brewer's yeast. It was a bit disgusting, but after reading about our microbiota, I realized how wise she was to force us to swallow it! For my whole spiel on that, read my post here.

In case you weren't in the mood to read all my marvelous prose at length, here's the bottom line on which food helps with each health issue (remember: don't substitute these for a visit to the doctor):   .


  • COLDS: Fresh citrus, raw honey, freshly minced garlic, oil of oregano.

  • BURNS:Manuka honey (or other raw dark hued honeys)

  • INFLAMMATION: Curry powder (turmeric

  • MENSTRUAL CRAMPS: Celery tea

  • STOMACH ACHE/INDIGESTION: Chamomile tea, and/or ginger tea 

  • NAUSEA: Ginger

FERMENTED FOODS: Consume regularly to help maintain health and especially after consuming antibiotics to restore your gut with good microorganisms and prevent invasion of bad ones. 


Thursday, September 12, 2013

The Break

I love NYC and I'm thankful for the privilege of living here, I've said that before. However, summer in the City is a tough, steamy business. And that's why whoever is able, leaves Manhattan every Friday by 2:00 PM or moves out for the entire season, fleeing to the beach or the country, near water, green, and trees. It's kind of a survival mechanism of everyone who can afford it logistically, financially, professionally and physically. For the last 12 years, we've spent summer in the City, and tried to take advantage of the amazing possibilities it has to offer during the hot months: concerts, The High Line, plays, Governors Island, playgrounds with sprinklers, Central Park, ice cream trucks, The Met's Roof Garden, Statue of Liberty, and the list keeps going. However, I do feel at unrest when the neighborhood turns into a ghost town.
Added to that feeling was the fact that my children refused to get into the swimming pool at every possible occasion. At 6-years-old, my son was even afraid of getting into the water! As a parent, even if I suck at many things, it's clear to me that I need to facilitate my kids basic survival skills, and swimming is on top of the list. 
Then the plan took shape: some very dear relatives with an empty apartment in Florida agreed to lend it to us. I thought there was no better encouragement for my non-swimmers to jump into the pool than the thermometer hitting the 90s and the peer pressure of day camp mates that have been swimming like dolphins since they were 2 months old. My heart is at rest now that both kids are diving in and comfortably swimming, yes doggy style, but that's enough to survive! 
I had lots of projects to take care of while we were in Florida: I brought some work with me and I was going to draw, paint, write a book, make my own yoga retreat by the pool, figure out how to fix the comments section on this blog, post weekly, become proficient in social media, detox my life, my soul, my body; and solve the whole professional tongue twister I've got myself into. 
But...as it happens when you are having fun (and when you have to drive kids to and from day camp, and you examining the isles at Whole Foods one product at a time), I didn't accomplish most of my goals. However, stepping out of my life routine did marvels. It helped me think, and start putting together my life after a couple of complex years. I'm a nutritionist with a master's in food studies, a certified pastry chef, a former cake designer, the owner of a tiny artisanal baking company of wholesome products, a blogger, a recipe developer and tester, someone who loves painting and learning about art, a writer who writes in a language that she's barely proficient in, a health food chef and advocate, a teacher and an ice cream lover! I studied and read a lot while I was away, I saw friends I had not seen in a long time, and I visited with myself too. There was no oven in the apartment, which at the beginning worried me. What was I going to do without one? The impossibility of an oven ignition ignited many other things in my brain. I made some tasty raw treats and not baking gave me the break and clarity that I needed more than I thought. The most exciting decision is that I'm getting certified as a Health Coach, and will soon launch my own practice. I hope this is the last piece of the puzzle that I've been trying to put together for almost 20 years, where my love for food and cooking, my history with eating (not always healthy, but where health has prevailed, and often related to my emotions), and the passion I feel about the culture, science, art and psychology that surround food, can come together while I work with people to help them feel happy and peaceful about eating well. 
Sometimes, we just need the break and step outside in order to understand ourselves better. I'm very thankful for having had this opportunity, and I hope I can learn to remove myself routinely in different ways when I need answers in my life.

I learned that stepping out is so helpful, that we started a tostada (or taco) night tradition that allows me to step out of the kitchen on a weekly basis. 
While in Florida, during one of my multiple visits to Whole Foods, I found these amazing Mexican oven baked flat tortillas 

http://ep.yimg.com/ca/I/mex-grocer_2268_286619078  
And why do I make a big fuzz over them, since every supermarket carries taco shells, tostitos and tortilla chips? 
Well, tortilla shells are an American invention. Most brands are greasy and full of additives and GMOs, so I wouldn't recommend those. These ones are flat and made just with ground corn processed with limewater, which is an ancient Mexican method of making tortillas, called nixtamalizacion. By adding the alkaline solution, the calcium content of the tortillas goes up to the roof, and the availability of the corn's B vitamins and aminoacids also increases considerably. Unfortunately, I can't find them in Manhattan and I'm waiting for my amazon order to arrive. In the meanwhile, I've been using organic tortilla shells, which aren't as nutritious as the nixtamalized tortillas, but at least don't have GMOs nor weird chemicals, and since I won't let a fightless dinner every week to pass, the shells will do for now.Alternatively, you can purchase corn tortillas and toast them on a baking sheet in the oven until they are firm; or, you can make your own tortillas from scratch using masa harina flour (nixtamalized corn flour), it's very easy, although a bit labor-intensive for a stepping-out-of-the-kitchen dinner. I'll blog about the how to soon!

So, how does tostada night work?  
Here's the tostada night scene:

Collage made on a CB2 catalog spread with cutouts from other magazines, watercolors, labels, washi tape and Lego figures


  • I make some beans (OK, canned also work if I lost you at "I make". I recommend EDEN organic brand, because it's can is BPA-free and they are unsalted and prepared with kombu seaweed, which makes them more digestible) 
  • Cut up MANY different veggies in a variety of colors (I often enlist my kids help): Romaine, red cabbage, zucchini ribbons (use a peeler all the way through), sliced radishes and/or kohlrabi, baby spinach, carrots, corn, assorted sprouts, etc
  • Make guac: Just avocados, fresh lime juice and sea salt, but feel free to add in onion and jalapeno or serrano chiles and cilantro.
  • I dice fresh tomatoes and season them with raw apple cider vinegar, a tiny bit of avocado oil, sea salt and fresh herbs, if I have them at hand.
  • Organic store-bought mild salsa
  • Goat milk yogurt or Greek yogurt (or sour cream) 
  • Shredded cheese or crumbled goat or sheep cheese.


 The rules are that the tortilla(s) should contain at least beans and 1 vegetable and everyone prepares his own. By having the fresh veggies in separate bowls, my kids end up eating way more of them than if I ever served them on a plate or combined and they love customizing their meal. They have their protein, their veggies, their fiber, their minerals and vitamins, their texture contrast and their independence (and mine!). 


*You can also cook ground beef, chicken or turkey and offer it along. If you keep kosher, just omit the yogurt or sour cream and serve Daiya vegan cheese instead of dairy cheese.

I should have written posts before Rosh Hashanah and Yom Kippur, but I was swamped with work. For pre-fast tips, please visit last year's post at: 

http://ironyofbaking.blogspot.com/2012/09/after-flood.html 

And here's the link to my Rosh Hashanah posts for Kosher Scoop. They were inspired for the New Year, but are great for the rest of the Holidays:


Apples and Honey--From Appetizer to Dessert. 

If you observe Yom Kippur, have a meaningful fast and G'Mar Chatimah Tova. If you don't, enjoy the day and have a delicious meal thinking of your Jewish friends!


Thursday, August 1, 2013

Inside Our Gut Feelings

I'm incredibly hyped about this post. I've seriously lost sleep thinking, reading and working on it! What I'm about to write, and I actually started to brush upon it in my last post, is the future. It's where conventional and alternative medicine, science, cuisine and of course, the industry, will head to for the upcoming years, and hopefully converge. 

Let's start with some good news: your body (and mine) weighs 4 pounds less than the number that the scale registers! 

Now that I've captured your attention, I'll explain. There's no new theory of gravity. What happens is that we have an extra organ in our body, that is not really part of our body (nor an actual organ) that weighs a bit more than 4 lbs. This organ is our intestinal (gut) flora, aka microbiome, biome, biota, friendly or good bacteria.
And why do I keep referring to it as an organ if it isn't one? Because the trillions of microorganisms (mostly bacteria, but there also are yeasts and other beings, which vary from person to person,) that populate our GI tract have such vital functions in our bodies, that they are as important as an actual organ. And we should take care of them!
Lately, more and more findings have been taking place regarding the amount, variety and actions of the microbiota, although a lot is still unknown. There's some exciting research going on, such as the American Gut Project,  which attempts to map all the microbes living in the bodies of the thousands of subjects of the general public (anyone who desires to participate in the study can do so, click on link above if you're interested) to understand the correlation between people’s lifestyle, diet, and health status with the makeup of their microbial community.
In past posts I've mentioned pro and prebiotics (just look at the previous entry), which are the stage names assigned to the friendly or good microorganisms that populate our gut (probiotics) and the food (prebiotics) that nourishes and helps them proliferate. So, to make it clear, probiotics are the bugs and prebiotics are their food.

So, what's the big deal? Here's what we already know about the functions of the gut flora:

  • PROTECTIVE: The biota keeps at bay pathogenic microorganisms in various ways:
- It occupies the physical space in our gut
- It consumes the nutrients that the pathogens may need
- It produces anti-microbial factors that would attack the unwanted bacteria, viruses and/or funghi. 

This explains why tourists may get Moctezuma's Revenge on their Mexican vacation (or anywhere else...), while the locals, whose floras are populated differently, can eat/drink the same things without suffering from food poisoning. Remember the scene in the Sex and the City movie (part 1) after Charlotte accidentally drinks water from the shower in Cabo?   

  • STRUCTURAL:
- The biota strengthens the host's immunity by triggering the secretion of IgA, a relatively non-inflammatory antibody that prevents foreign substances from being absorbed into the intestinal cells.

- It forms a physical barrier between the inside of the gut and the bloodstream.

- It tightens the cell junctions (space between intestinal cells), so no unwanted compounds can permeate in between cells, avoiding leakage. A leaky gut is when certain particles that shouldn't permeate from the intestines into the bloodstream, do make their way into the blood and cause reactions that could end up in inflammation, and therefore, disease, such as metabolic syndrome, eczema, allergies, asthma, celiac disease, Crohn's disease, IBD, other autoimmune diseases, even autism. 

  • METABOLIC: The microbiota is involved with our digestion, absorption and metabolism of certain vital substances. 
- It helps break down foods we can't digest
- It synthesizes vitamin K, B1, B2, B3, B6 and B12, certain neurotransmitters (including "feel-good" serotonin), enzymes, and other essential nutrients, such as amino acids and short-chain fatty acids, some of which play a role in brain function, and may even modify our temperament. 
- It produces signaling chemicals that regulate our appetite, satiety and digestion.

All this has such a powerful impact, that it's been suggested that the composition of our biota may be as, or even more important, than our genetic makeup. The most promising part is that although we are pretty much stuck with the biology we inherited from our parents, the composition of our biota can be modified, restored (or damaged) and cultured. And since microorganisms' adapt and multiply way faster than our bodies, this might work in our favor to help us adapt to changes in the environment and increase our immunity.

To understand a bit better all this impossible-to-understand stuff, let's talk about how we get our specific gut flora: While we are in our mother's womb, we are sterile, but during birth, we pick up our first batch of microorganisms from our mother's birth canal (OK, vagina). Then, breast milk follows. Once thought to be sterile, mother's milk contains both, pre and probiotics, which stimulate the colonization of the baby's gut (it's been shown that C-section and formula-fed babies' biota doesn't resemble as much to their parents' gut flora, but more to their skin's, which might not be as protective as the former). Then, during the first 3 years of life, with the introduction of solid foods and the environment (remember?, those are the years during which babies and toddlers put everything into their moths and you pray that she survives after licking everything in the playground's sandbox), the biota shapes into a more stable, adult-like microbioma, that could still change, but not as readily as in the first 3 years, because the flora is more strongly established, and the new microorganisms would have to fight harder for a spot in our gut. All those practices of  boiling the baby's pacifier every time it falls (best results are when the parents lick it!) and spraying all the toys and surfaces with Lysol after a play date, although well-intentioned, might not be for the best (not judging, I did it myself!). Why? Because by wanting to kill the bad germs, we're wiping out too the ones our little ones need, and we're interfering with the development of their bioma. I have nothing against cleanliness, but we might have to chill a bit in the antibacterial end, and learn when we should resort to Clorox, Purell or boiling water, and when just a milder way of cleaning would be best. 
A factor that interferes severely with the composition of our bioma at any age is the use of antibiotics; which are some times necessary to preserve our health, but the abuse of them might put it in danger. Antibiotics kill the bad, but also the good  microorganisms inside us. It's a good idea to make an effort to restore and replenish our flora after using antibiotics. This is easier said than done, as we don't know exactly what kinds and amounts of bugs we should ingest as probiotics (and variety seems to be key in a healthy flora), because we don't know with precision which ones we had before the antibiotics, and because often, probiotic supplements are not really what they state they are (no regulation!), or they don't survive the stomach's acidity. Although there are some proven to work. So far, diet might be the most controllable tool we have to work on our gut microcommunity from home and easily. Since foods are complex compounds, not isolated beings or nutrients, and are influenced by the environment where they were produced, non-industrialized foods might be the best vehicles of diverse good bacteria we have.
It's important to include:
  • Fermented foods (the fermentation process is caused by good bacteria and in some cases yeast), so they contain the actual bugs (probiotics). The most widely available are: kefir, yogurt (both with "live cultures," don't bother if the label doesn't state they are live this), and raw (again, don't bother if they're pasteurized) kimchi, sauerkraut, kombucha, miso, tempe and some pickles. Or, venture into making your own!
  • Prebiotics (mainly fiber): Different microorganisms eat different foods, so a variety of types of fiber (plant foods) is key to support a diverse community of microbes: whole grains, root vegetables, nuts, beans, bananas and other fruits, bran, leafy greens, Jerusalem artichokes, asparagus, garlic, onions, and avocados. For more on fiber, click here. Among other prebiotics are raw honey and raw apple cider vinegar.
  • Unprocessed foods: Quoting Michael Pollan (my favorite activity, and I must say I was tempted to just copy and paste the whole article!) in The NY Times magazine: "The less a food is processed, the more of it that gets safely through the [entire] gastrointestinal tract and into the eager clutches of the microbiota." Processed foods have been "predigested" for us, by removing layers of compounds and nutrients that our bodies and our biota need. A diet rich in processed foods with no fiber (or artificially added fiber that doesn't contain all kinds of fiber), lots of refined sugar, artificial chemicals and fats, doesn't feed our microbiota what it needs, so we're not only depriving our body from nutrients, but we're being rude hosts! Besides variety and nutritional structure of the food, the preparation (less is more) of it also affects the flora. As Pollan writes, "al dente pasta, for example, feeds the bugs better than soft pasta does; steel-cut oats better than rolled; raw or lightly cooked vegetables offer the bugs more to chomp on than overcooked, etc." So be gracious to your gut when you prepare a meal!
Scientists claim they are still far from completely understanding all the implications and mechanisms of our microbiota, thus refuse to make statements and reach conclusions too early. However, while researching this fascinating topic, I found out about Dr. Natasha Campbell-McBride. She became a medical doctor in her native Russia, practiced as a Neurologist and Neurosurgeon and later moved to the UK, where she earned a postgraduate degree in Neurology and another one in Nutrition. After her own child was diagnosed with autism, she developed a diet to treat him. Her results where so amazing, that she ended up "working with hundreds of children and adults with neurological and psychiatric conditions, such as autistic spectrum disorders, attention deficit hyperactivity disorder (ADHD⁄ADD), schizophrenia, dyslexia, dyspraxia, depression, OCD, bi-polar disorder and other neuro-psychological and psychiatric problems," and published her first book with the diet protocol (followed by 2 more books ), called Gut and Psychology Syndrome (GAP Syndrome or GAPS)™. The term refers to  "a condition which establishes a connection between the functions of the digestive system and the brain." She believes that an intestinal flora that is not well balanced or is damaged is to blame for for an endless list of diseases and conditions (that start with a leaky gut). One of the reasons why she caught my interest when I first read about her was that her diet is a modification of the SCD (Specific Carbohydrate Diet), a diet I'm familiar with through a client of mine who's been able to control his Crohn's disease completely (no medication whatsoever) by following the SCD, which is a restrictive diet, that offers great results for many digestive disorders. It requires lots of will power, organization and commitment, but it works! Dr Campbell-McBride's version aims to detoxify the body and once it's clean, to the biota (she claims that plant foods detoxify and cleanse our bodies, while animal foods help build and feed them...). Her method differs a lot from conventional medicine and she encourages, among other things, the consumption of homemade fermented foods, including the use of raw dairy transformed into yogurt, kefir and butter, as she claims pasteurization deprives the food from its probiotic qualities. As it happens every time a new idea is introduced in a field, some members of the scientific community criticise her, while others praise her, but I find interesting that her third book is a compilation of personal stories of patients documenting how the GAPS diet healed them....
This video is a brief explanation of her theory. And this is a list of all the diseases she says we can heal through her dietary protocol.

Bottom Line: There's a lot coming regarding our microscopic tenants. Perhaps the American Gut Project can help us understand Dr Campbell-McBride's theories (and demonstrate if they do work or not). While we wait, let's be super good hosts and take care of our flora. Let's encourage breast feeding, use antibiotics only when truly needed, eat lots of different kinds of fiber, learn to ferment foods, take preventive measures in case of a C-Section*, not go crazy with sanitation, decrease our processed food consumption, and love our gut!  
Plus, now we know that if we sit in a restaurant by ourselves, we will never be dining solo!

* Pollan writes that the head of the sequencing and analyzing lab he met, used a cotton swab to inoculate his newborn infant’s skin with the mother’s vaginal secretions to "insure a proper colonization after an emergency C-section. A formal trial of such a procedure is under way in Puerto Rico."

Recommended reading:

  • Dr. Campbell-McBride: http://www.doctor-natasha.com/index.php
  • Review article: Ecology of Host-Associated Microbial Communities: http://www.ncbi.nlm.nih.gov/pmc/articles/PMC2937523/
  •  Diversity, stability and resilience of the human gut microbiota:   http://www.nature.com/nature/journal/v489/n7415/full/nature11550.html
  • Pollan's article: http://www.nytimes.com/2013/05/19/magazine/say-hello-to-the-100-trillion-bacteria-that-make-up-your-microbiome.html?pagewanted=all&_r=0 

  • American Gut Project: americangut.org

  • Lisa Rose's Sauerkraut tutorial: http://www.realfoodkosher.com/simple-sauerkraut-a-probiotic-superfood/
  •  Boyd, C. Love Your Gut: The Startling Role of Intestinal Flora in Food Allergy and Celiac Disease. Living Without. USA August/September 2013
  • Egan, S. Making the Case for Eating Fruit in the NYT:  http://well.blogs.nytimes.com/2013/07/31/making-the-case-for-eating-fruit/?_r=1&

     
Pre and Probiotic Chilled Soup

This recipe is much better than the name I decided to assign it! Since there's no cooking involved, the bugs are still intact and quite delicious, plus there's plenty of fiber for them to enjoy the meal as much as you do. I made it with SO Delicious Dairy Free Cultured Coconut Milk, as kefir, because I was serving the soup during a meat meal. This product is a descent option when dairy is an issue, although it contains carrageenan, a sea vegetable extract that might trigger inflammation, and other additives so I wouldn't recommend it for daily use. Plain kefir from cow or goat's milk, preferably organic, are great options, or a homemade version with those milks or coconut milk (although I haven't found a pareve kefir starter with certification just yet, but will report if I do).


Ingredients

2 cups plain kefir (see note above)
30 green seedless grapes,
plus more for garnish

3/4 Brazil nuts (or almonds), preferably soaked overnight in water, drained and rinsed before using
1/4 cup original raw kombucha, optional

1 mini cucumber
3 dates, pitted
2 cloves garlic
1 tbsp  + 1 tsp white miso paste

2 tablespoons extra virgin olive oil, plus more for garnish
6 leaves fresh mint, more to taste and for garnish
1 tbsp raw, organic apple cider vinegar,
or more to taste
Sea salt
, to taste

Water, if needed

Method
Whiz everything, except the water, in a blender until completely pureed. If too thick, thin with a bit of water or more kombucha. Adjust seasoning, cover and refrigerate overnight.
Serve with sliced grapes, fresh mint and a drizzle of extra virgin olive oil.
Enjoy!

Serves 4. Can be doubled.

Mickey and his biota loved it!